
Securing Students, Staff, and Valuable Assets in Education
Create more effective security plans using cloud-based access control & video surveillance technology
We support the entire education journey.
An integrated security solution from Anviz supports the entire education journey. From K-12 schools to community colleges, universities, and graduate schools – we work with institutions of all sizes to deliver the education security solution you need to be future-ready.

Early Childhood Education
Grant access to approved employees and parents and create a smooth school safety solution that gives parents peace of mind.

K-12 Education
Prevent unauthorized intruders, monitor access points for risks and initiate campus lockdowns during an emergency.

Colleges and Universities
Promote campus safety from dorms to classrooms and everything in between.
Benefits of Anviz solution for your campus or school security
Anviz’s powerful, cloud-based systems for K-12 and university campuses streamlines school security management and empowers educators with:

-
Security & Safety
Our connected video surveillance, audio, and access control technology give you better visibility, better control and better communication across your school district or campus. With intelligent analytics that provide early threat detection, we help you prevent or mitigate security incidents before they escalate.

-
Flexibility & Scalability
Anviz integrated solutions are scalable and flexible, allowing you to easily integrate your access control solution with other campus services like cashless vending, meal plans, printing, library systems, transportation services, and more—all on one unified management platform.

-
Students & Staff experiences
Touchless and mobile technology to provide your staff and students with a safer, healthier, and more convenient experience. Minimize admin distractions for staff and students to help them get on with the central task of learning. Anviz creates a welcoming and secure campus environment with a solution that is designed to seamlessly fit into its surroundings.

-
Simplified management
To handle all the security and smart classroom needs, minimizing IT complexity and enhancing easy management while reducing costs is another top concern. Anviz can help here with a unique, highly efficient, "all-in-one" hardware and software architecture. Streamline campus access management to reduce costs and increase flexibility.
Benefits of Anviz solution for your campus or school security
Anviz’s powerful, cloud-based systems for K-12 and university campuses streamlines school security management and empowers educators with:

Security & Safety
Our connected video surveillance, audio, and access control technology give you better visibility, better control and better communication across your school district or campus. With intelligent analytics that provide early threat detection, we help you prevent or mitigate security incidents before they escalate.

Flexibility & Scalability
Anviz integrated solutions are scalable and flexible, allowing you to easily integrate your access control solution with other campus services like cashless vending, meal plans, printing, library systems, transportation services, and more—all on one unified management platform.

Students & Staff experiences
Touchless and mobile technology to provide your staff and students with a safer, healthier, and more convenient experience. Minimize admin distractions for staff and students to help them get on with the central task of learning. Anviz creates a welcoming and secure campus environment with a solution that is designed to seamlessly fit into its surroundings.

Simplified management
To handle all the security and smart classroom needs, minimizing IT complexity and enhancing easy management while reducing costs is another top concern. Anviz can help here with a unique, highly efficient, "all-in-one" hardware and software architecture. Streamline campus access management to reduce costs and increase flexibility.
What we offer

Visitor Tracking
Campuses host parents, volunteers and guests – control access and track who is on site with Visitor Management

Attendance management
Access your time and attendance data from any internet-connected device or download the mobile app for flexible deployment

Smart access
Face recognition, smartphone and students smart card compatibility eliminates the risks and costs of lost keys

Parking management
Anviz offers a system for school buses that performs real-time identity authentication for drivers and passengers and transmits records to a headquarters server via 4G wireless connection

Health Management
Anviz contactless solution also provides an thermal temperature measurement for educational institutions that still require health checks

Perimeter security management
Our technology helps you remotely monitor your perimeter and identify culprits if incidents do occur
Our advantages

Intelligent applications serve a variety of needs
Versatile and interactive applications for the construction of digital campuses with improved automation levels and enhanced security

Intelligent applications serve a variety of needs
Versatile and interactive applications for the construction of digital campuses with improved automation levels and enhanced security

Intelligent applications serve a variety of needs
Versatile and interactive applications for the construction of digital campuses with improved automation levels and enhanced security
Related solutions
Related Faq
-

Contents
Part 1. CrossChex Connection Guide
1) Connection Via the TCP/ IP model
2) Two ways to remove the admin permissionPart 2. Reset Anviz Devices Admin Password
1) Connected to the CrossChex but the admin password is lost
2) The device communication & admin password are lost
3) The keypad is locked, and communication and admin password are lost
Part 1: CrossChex Connection Guide
Step 1: Connection via the TCP/IP model. Run the CrossChex, and click the 'Add' button, then the 'Search' button. All available devices will be listed below. Choose the device that you want to connect to the CrossChex and press the 'Add' button.

Step 2: Test if the device is connected to the CrossChex.
Click the 'Synchronize time' to test and make sure the device and CrossChex are connected successfully.
 2) Two methods to clear the administrator's permission.
Step 3.1.1
Select user/s that you want to cancel administrator permission, and double click the user, then change 'administrator' (the administrator will display in red font) to 'Normal user'.
CrossChex -> User -> Select one user -> change Administrator -> Normal user

Choose 'Normal user', then click the 'Save' button. It will remove the user's admin permission and set it as a normal user.
Step 3.1.2
Click 'Set Privilege', and choose the group, then click the 'OK' button.


Step 3.2.1: Back up the users and records.


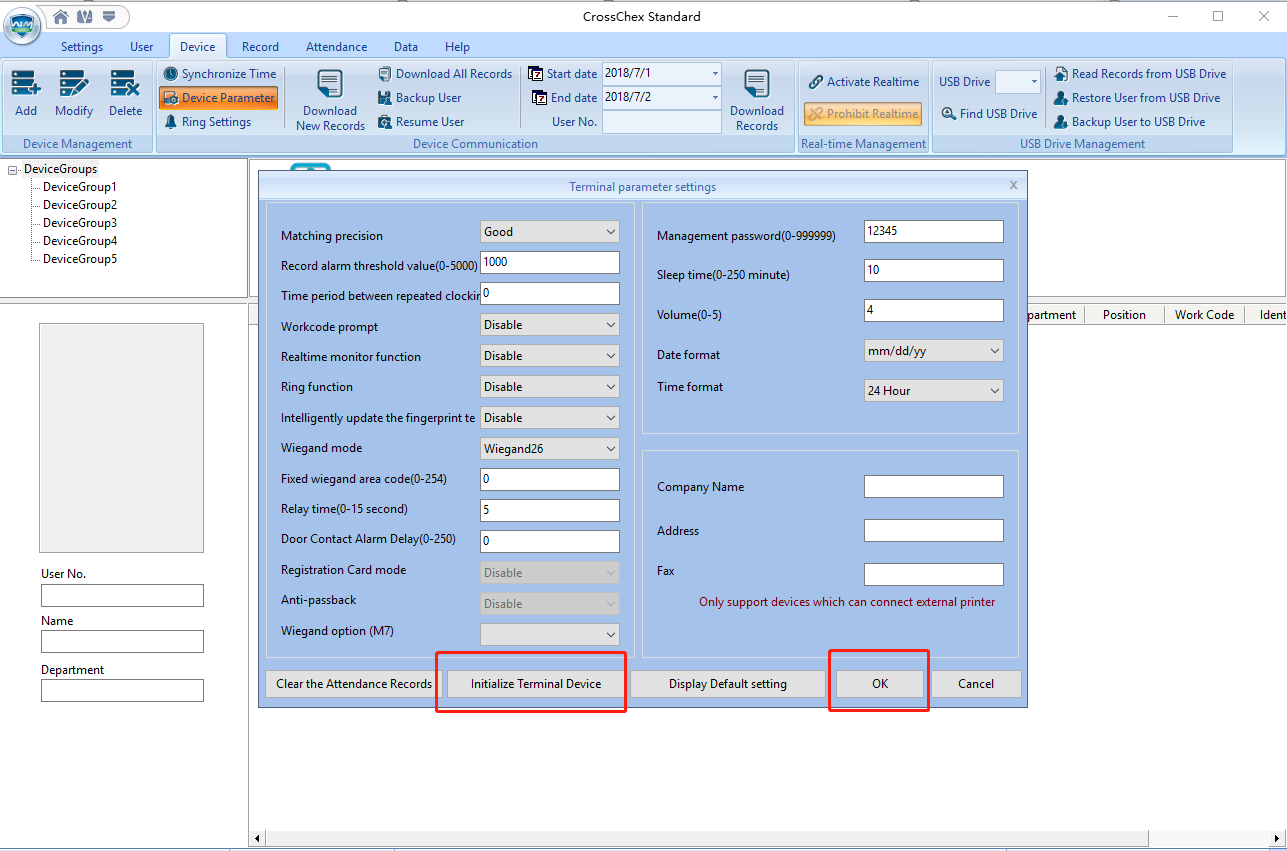
Step 3.2.2: Initialize the Anviz Device (********Warning! All Data Will Be Removed! **********)
Click 'Device Parameter' then 'Initialize the device, and click 'OK'

Part 2: Reset Aniviz devices admin password
Situation 1: Anviz device is connected to the CrossChex but the admin password is forgotten.
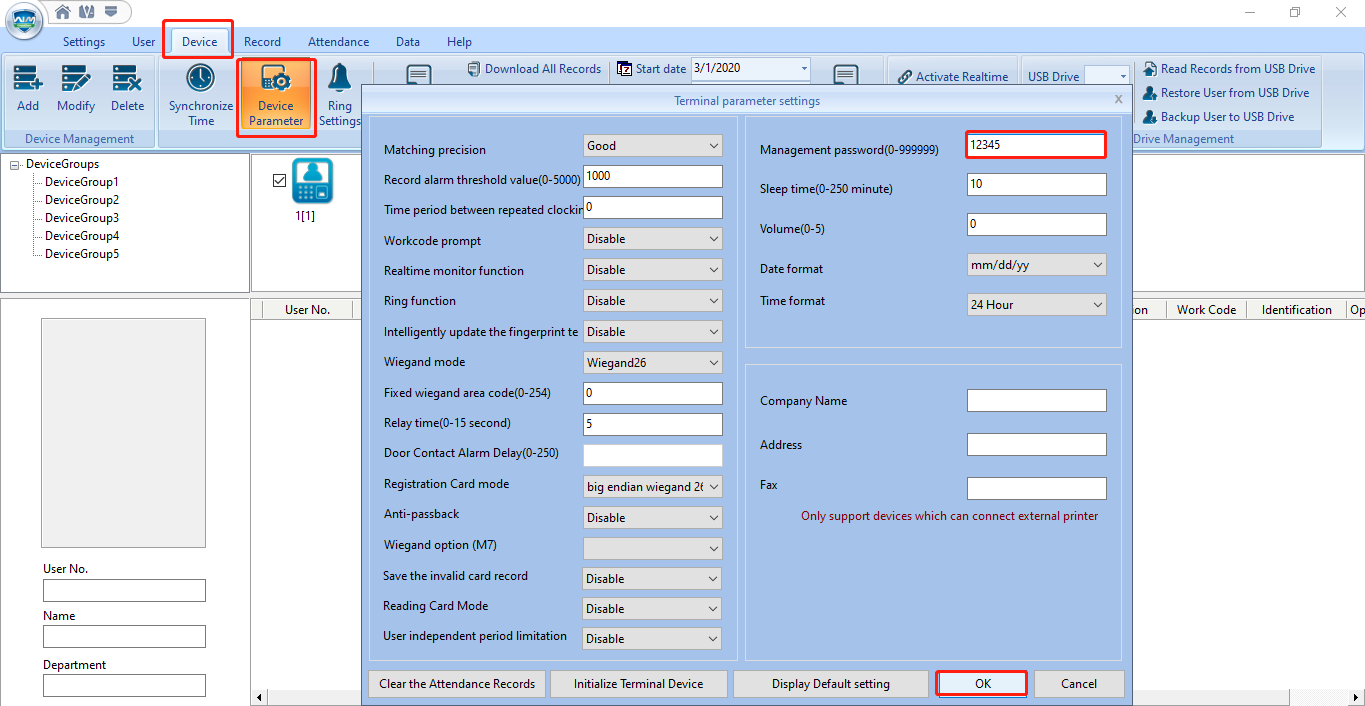
CrossChex -> Device -> Device Parameter -> Management password -> OK

Situation 2: The device's communication & admin password are unknown
Input '000015' and press 'OK'. A few random numbers will pop up on the screen. For security reasons, please send those numbers and the device serial number to the Anviz support team (support@anviz.com). We will provide technical support after receiving the numbers. (Please DO NOT turn off or restart the device before we provide technical support.)

Situation 3: The keypad is locked, communication and admin password are lost
Input 'In' 12345 'Out' and press 'OK'. It will unlock the keypad. Then follow the steps as Situation 2.
-

Contents:
Part 1. Firmware Updates Via Web Server
1) Normal Update (video)
2) Forced Update (video)
Part 2. Firmware Updates Via CrossChex (video)
Part 3. Firmware Updates Via Flash Drive
1) Normal Update (video)
2) Forced Update (video)
.
Part 1. Firmware Update Via Web Server
1) Normal Update
>> Step 1: Connect Anviz device to PC via TCP/ IP or Wi-Fi. (How to connect to CrossChex)
>> Step 2: Run a browser (Google Chrome is recommended). In this example, the device is set in the server mode and IP address as 192.168.0.218.
>> Step 3. Enter 192.168.0.218 (Your device might be different, check the device IP and enter IP address) in the browser address bar to run as the webserver mode.

>> Step 4. Then enter your user account, and password. (default User: admin, Password: 12345)

>> Step 5. Choose 'Advance Setting'

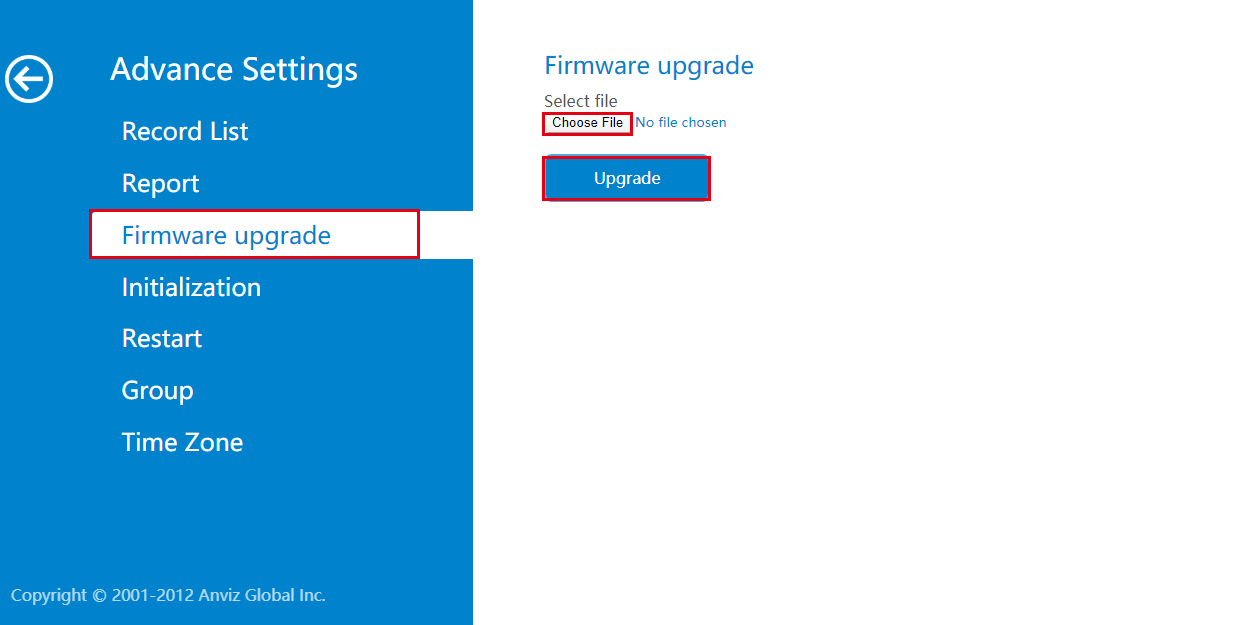
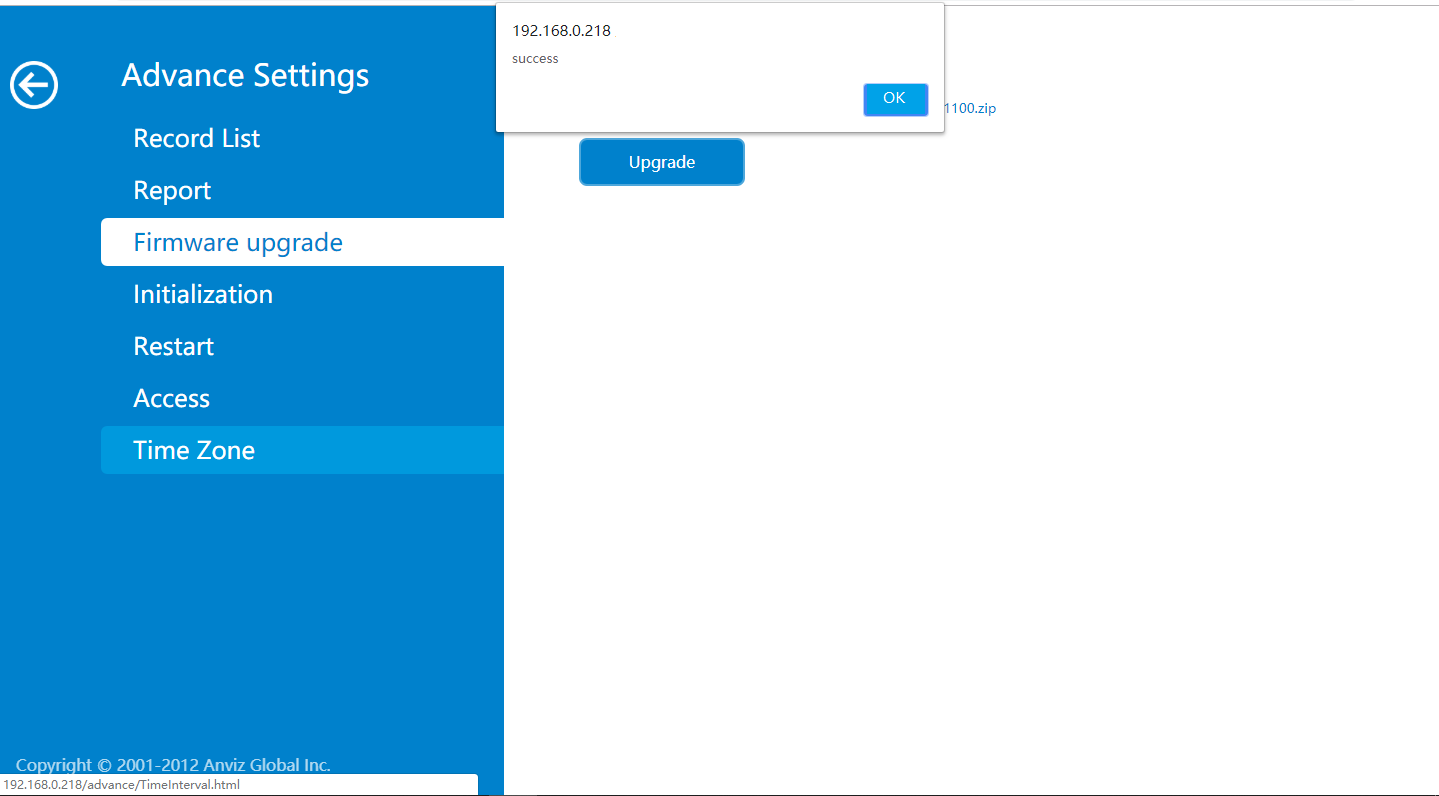
>> Step 6: Click 'Firmware Upgrade', choose a firmware file that you want to update and then click 'Upgrade'. Wait for the updating complete.

>> Step 7. Update Complete.

>> Step 8. Check the firmware version. (You can check current version either on webserver info page or on the device info page)
2) Forced Update
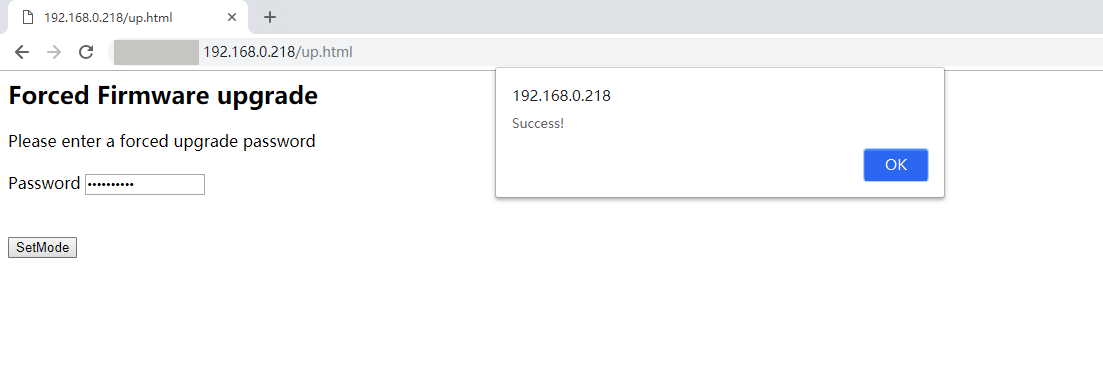
>> Step 1. Follow the steps above till steps 4, and enter 192.168.0.218/up.html or 192.168.0.218/index.html#/up in the browser.


>> Step 2. Forced Firmware Upgrade mode is set successfully.

>> Step 3. Operate Step 5 - Step 6 to finish the forced firmware updates.
Part 2: How To Update Firmware Via CrossChex
>> Step 1: Connect the Anviz device to the CrossChex.
>> Step 2: Run the CrossChex and click the 'Device' menu on the top. You will be able to see a small blue icon if the device has connected to the CrossChex successfully.

>> Step 3. Right-click the blue icon, and then click the 'Update Firmware'.

>> Step 4. Choose the firmware that you want to update.

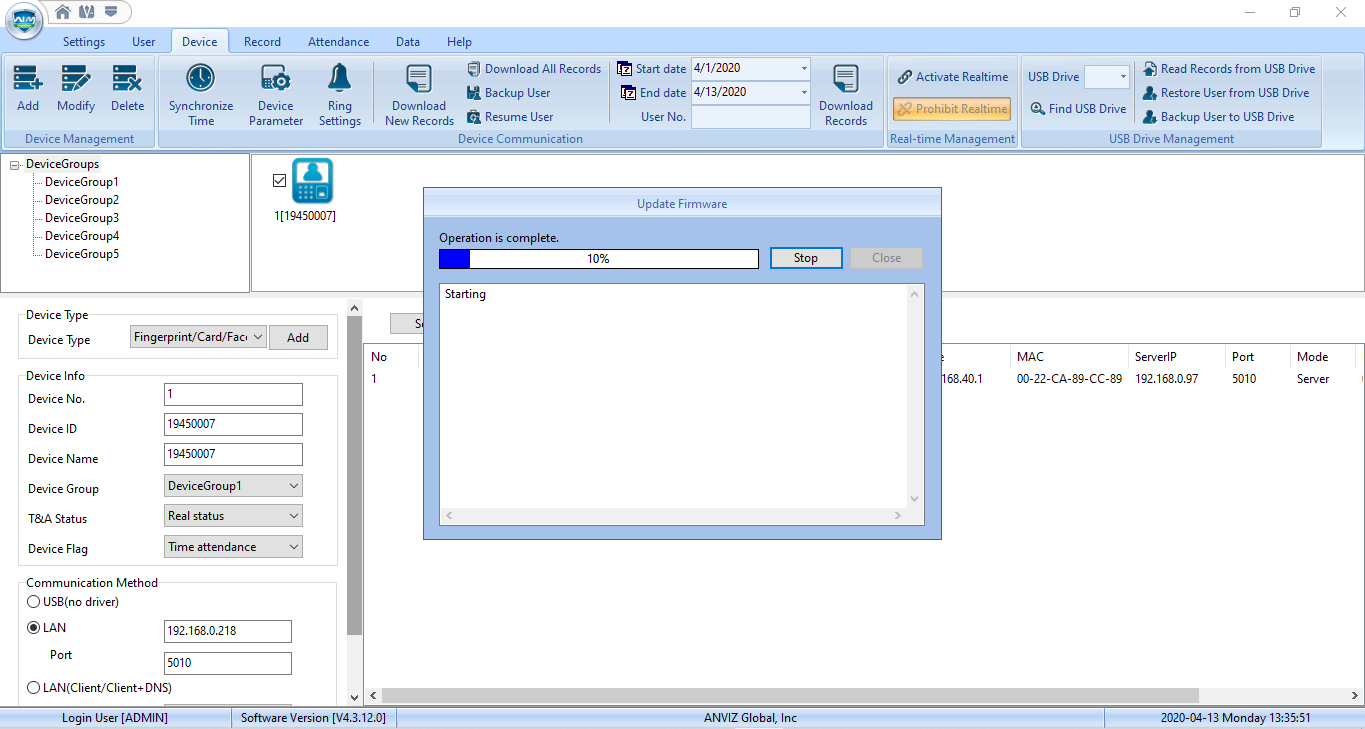
>> Step 5. Firmware update process.

>> Step 6. Firmware Update Complete.

>> Step 7. Click the 'Device' -> Right-Click the blue icon -> 'Device Information' to check the firmware version.

Part 3: How To Update The Anviz Device Via Flash Drive.
1) Normal update mode
Recommended Flash Drive Requirement:
1. Empty Flash Drive, or place firmware files in the Flash Drive root path.
2. FAT file system (Right-click USB Drive and click 'Properties' to check the Flash Drive file system.)
3. Memory Size under 8GB.
>> Step 1: Plug a flash drive (with an update firmware file) into the Anviz Device.

You will see a small Flash Drive icon on the device screen.
>> Step 2. Login with Admin mode to the device -> and then 'Setting'

>> Step 3. Click 'Update' -> then 'OK'.

>> Step 4. It will ask you to restart, press 'Yes(OK)' to restart once to complete the update.

>> Done
2) Force update mode
(****** Sometimes devices are not allowed to be updated, this is because of device protection policy. You can use force update mode when this situation occurs. *****)
>> Step 1. Follow the Flash Drive Update from step 1 - 2.
>> Step 2. Click 'Update' to get into the page like showing in the below.

>> Step 3. Press 'IN12345OUT' in the keypad, then the device will change to forced upgrade mode.

>> Step 4. Click 'OK', and the device will restart once to complete the update.

>> Step 5. Update Complete.
-
How to Enroll a User on FaceDeep 3? 06/11/2021
Created by: Chalice Li
Modified on: Tue, June 1st 2021 at 10:20

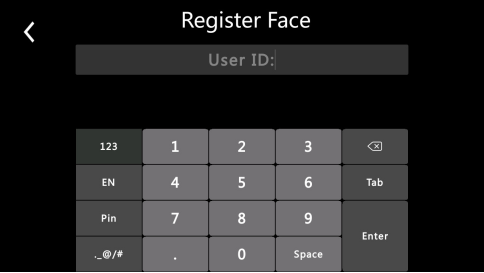
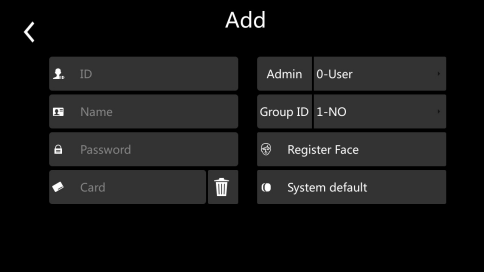
There are two ways to register users. You can do the quick enrollment by enrolling face(A). If you want to do the detailed enrollment, please go to the User, and add user(B) under this menu.
A.) Enroll face


B.) Add user


Please mail to support@anviz.com if you have any questions!
Anviz Technical Support Team -
Created by: Chalice Li
Modified on: Fri, June 4th 2021 at 11:58

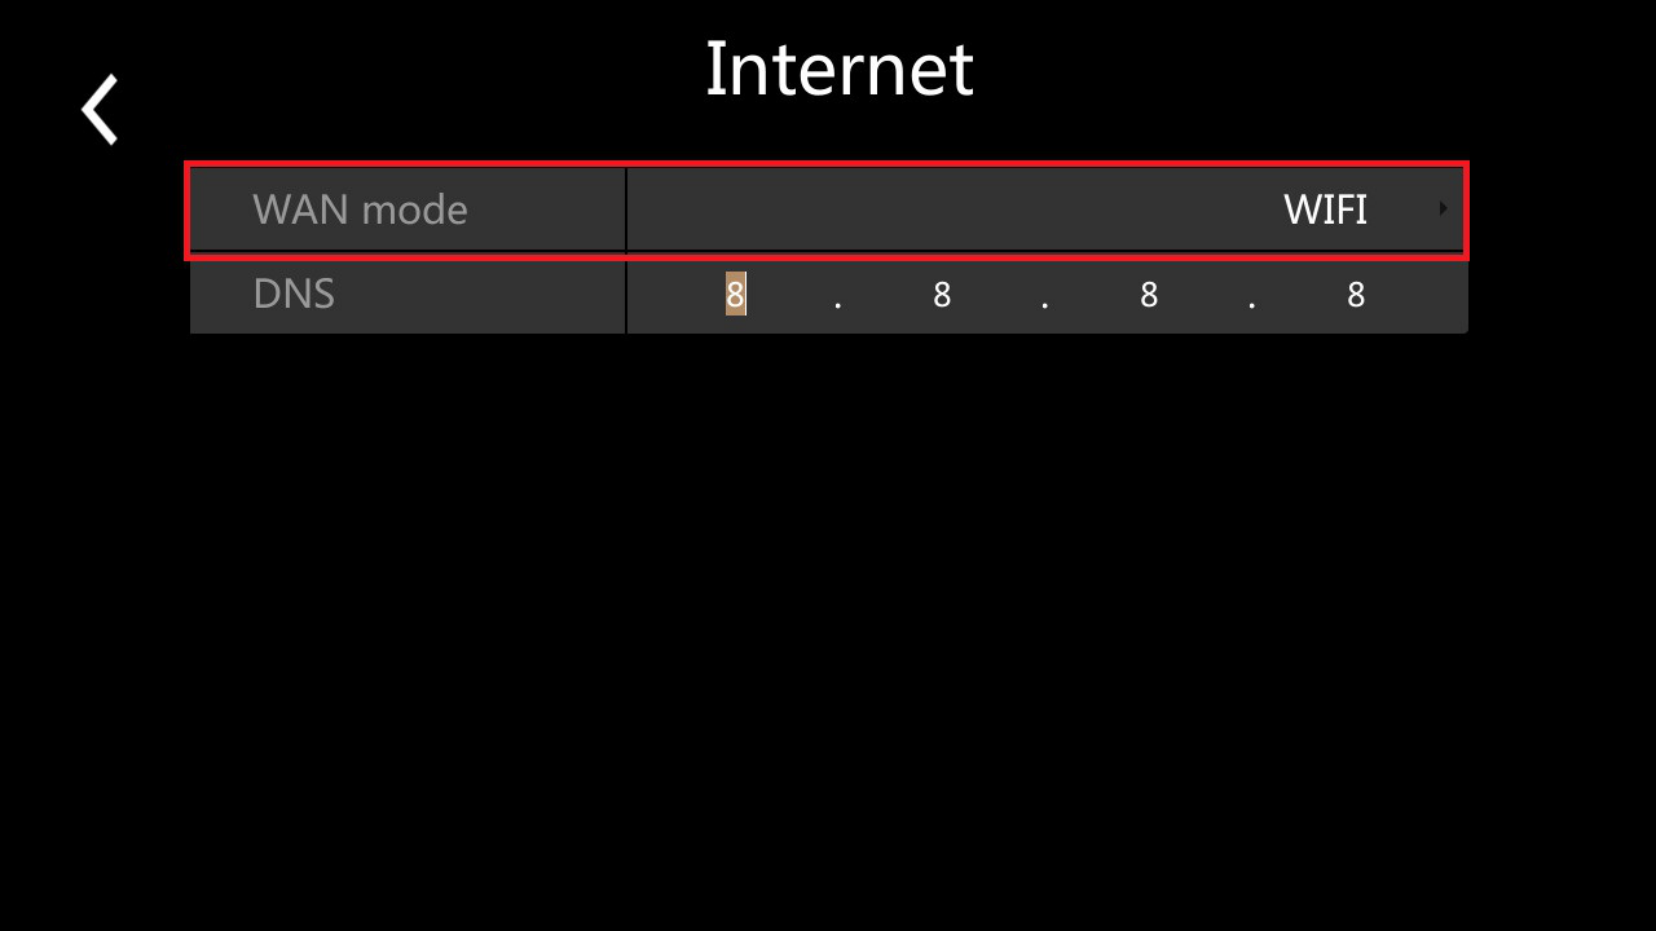
Step1: Enter the network menu from the main menu

Step2: Set WAN mode as WIFI

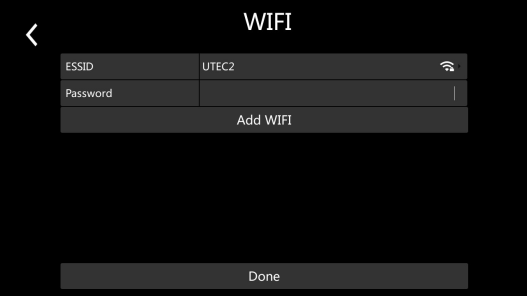
Step3: Go to the Wifi menu, finish your wifi IP mode setting and search your wifi.


Step4: Use the CrossChex software to add the device. You can either search the device or manually input the device IP address in the LAN method under the device setting.

Please mail to support@anviz.com if you have any questions!
Anviz Technical Support Team
-
Created by: Chalice Li
Modified on: Tue, June 1st 2021 at 16:12

To downgrade or upgrade the special firmware for the FaceDeep 3 /FaceDeep 3 IRT devices, you need to enforce the upgrade of the FaceDeep 3 Series by USB Flash Drive.
The detail steps as below:
Step 1: Please prepare the USB Flash Drive with FAT format and capacity less than 8GB.
Step 2: Copy the firmware file to USB Flash Drive and plug the USB Flash Drive to the FaceDeep 3’s USB port.
Step 3: Setup FaceDeep 3 Series to enforcing firmware upgrade mode.

Enter into device Main menu, click Settings and select the Update.


Please quick click the “USB Disk” icon in the FaceDeep 3 screen with (10-20 times) till popup the Update Password input interface.


Input the “12345” and click “Enter” to Forced upgrade mode! Click “Start” to upgrade the firmware. (Please make sure the USB Flash Drive already plug into device.)


After upgrade the firmware please restart the device and check the Kernel Ver. from Basic Info is gf561464 to ensure the upgrade is successful. If not please check the opertaing steps and upgrade the firmware again.

Please mail to support@anviz.com if you have any questions!
Anviz Technical Support Team -
Created by: Felix Fu
Modified on: Wed, June 3rd 2021 at 20:44

Please make sure the Anviz device has already connected with the internet and linked with a CrossChex Cloud account before you connect the device to CrossChex Cloud System. If you don't know how to make the device online, please check the FAQ on how to connect the device on FaceDeep 3.
Once the network setting is all good, we can proceed with the cloud connection setup.
Step1: Go to the device management page (put user:0 PW: 12345, then ok) to select network.

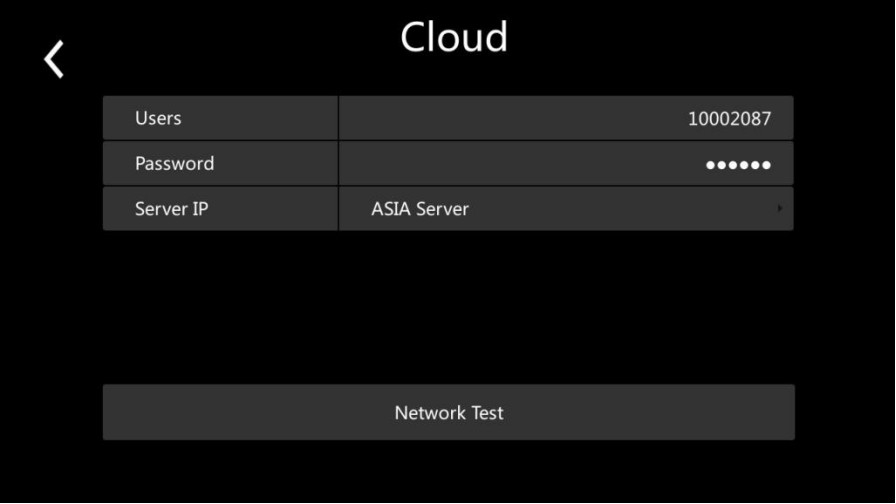
Step2: Choose Cloud button.

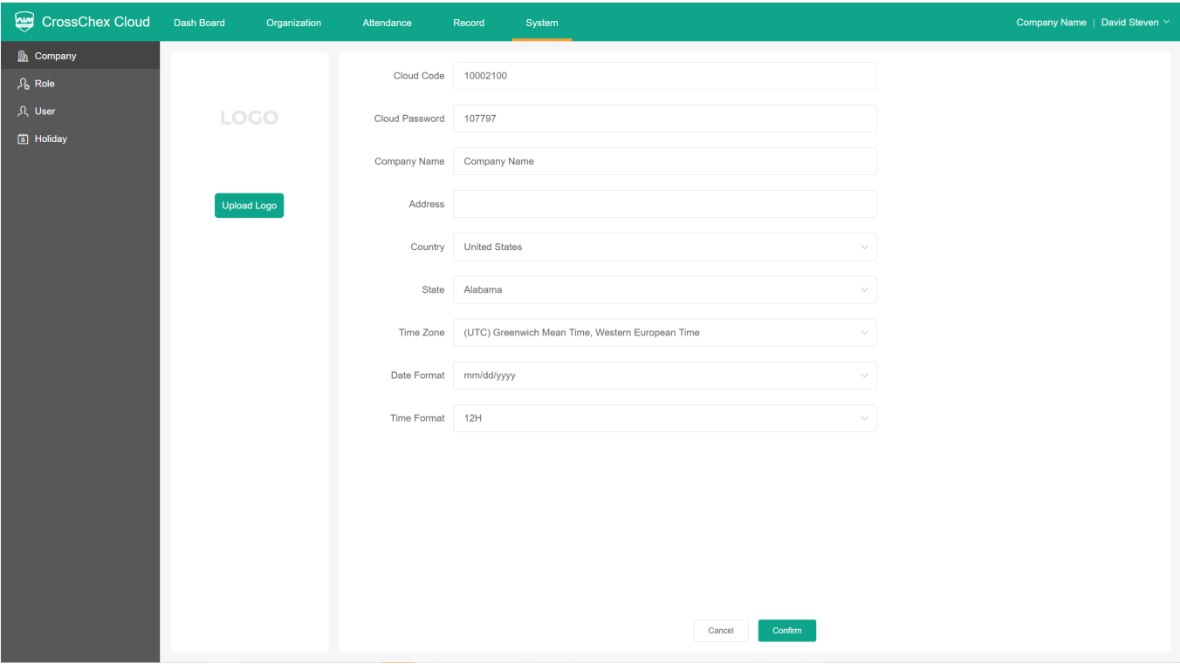
Step3:Input User and Password which is the same as in the Cloud System, Cloud Code, and Cloud Password.

Note: You can get your account information from your cloud system as below picture, cloud code is your account id, cloud password is your account password.

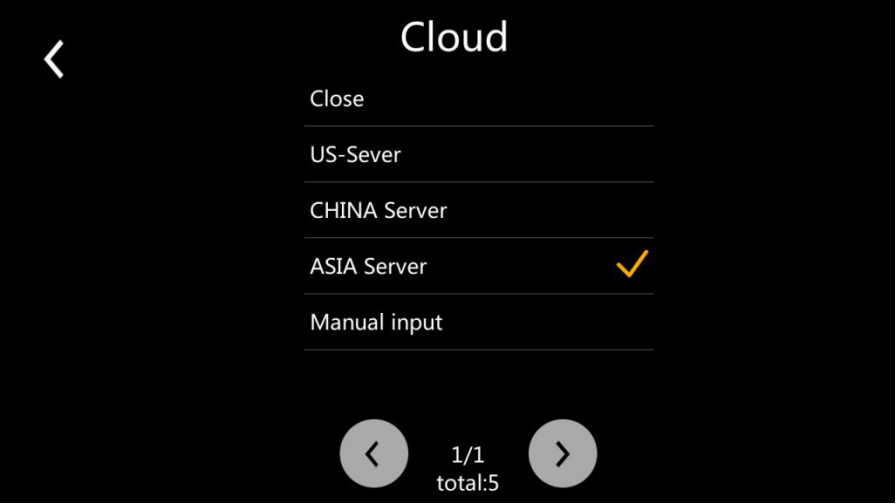
Step4: Select the server
US - Server: Worldwide Server: https://us.crosschexcloud.com/
AP-Server: Asia-Pacific Server: https://ap.crosschexcloud.com/
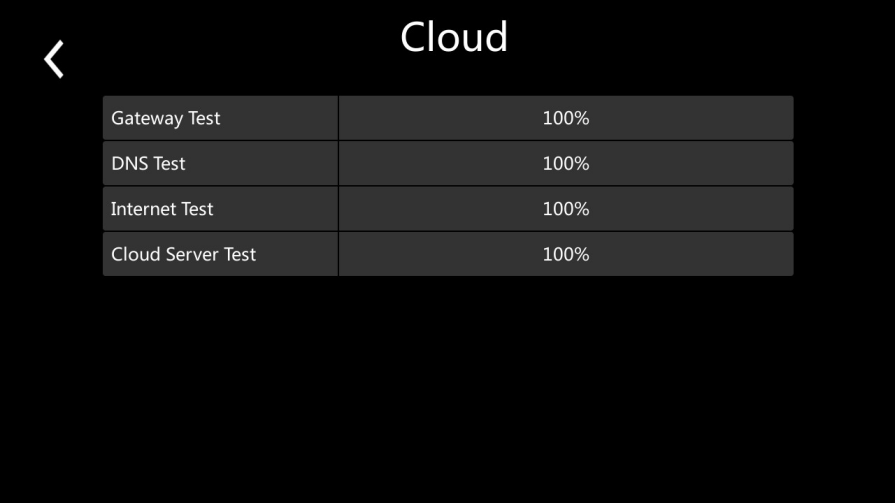
Step5: Network Test

Note: After the device and CrossChex Cloud are connected, the on the right corner Cloud logo will disappear;
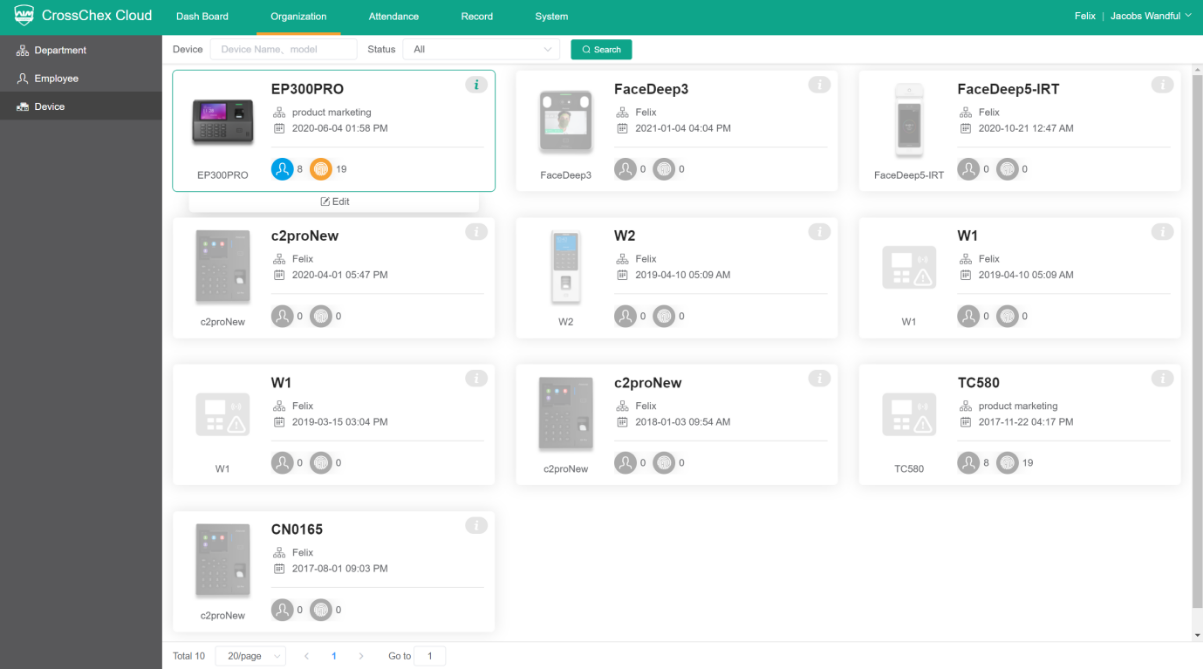
Once the device connects with CrossChex Cloud successfully, the device icon will be lit up.

Please mail to support@anviz.com if you have any questions!
Anviz Technical Support Team -
Created by: Chalice Li
Modified on: Fri, June 4th 2021 at 15:58

Step1: Enter the network menu from the main menu

Step2: Set WAN mode as Ethernet

Step3: Go to Ethernet menu, finish your Ethernet ip mode setting,DHCP or static depends on the local network setting.

Step4: Use the CrossChex software to add the device. You can either search the device or manually input the device IP address in the LAN method under the device setting.

Please mail to support@anviz.com if you have any questions!
Anviz Technical Support Team
-
How to Check Records in FaceDeep 3? 06/11/2021
Created by: Chalice Li
Modified on: Fri, June 4th 2021 at 16:58

When an employee performs a clock-in or clock-out on the device, it will display below the status interface with the punch time. Employees can select the function key which is pointed by red arrow and view records.


Please mail to support@anviz.com if you have any questions!
Anviz Technical Support Team
-
How to Enable Mask Detection? 06/11/2021
Created by: Chalice Li
Modified on: Fri, June 7th 2021 at 17:58

Step1: Go to the application menu through the advanced menu
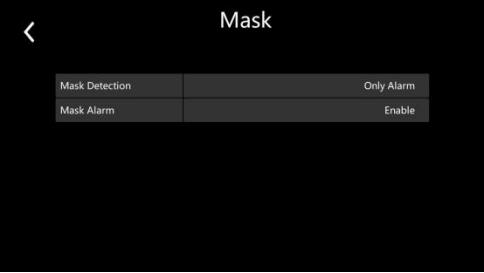
Step2: Go to the Mask menu


Step3: Mask detection function can be enabled under this menu. The admin can set mask detestion function as only alarm or access control purpose.

Note: You can also configure an alarm trigger in mask menu.
Please mail to support@anviz.com if you have any questions !
Anviz Technical Support Team
-
Can I Install FaceDeep 3 on Outdoor Areas? 06/09/2021
Created by: Chalice Li
Modified on: Mon, June 7th 2021 at 16:58

Our FaceDeep3 is not a waterproof device, we don’t suggest customer to install it at any outdoor areas.
Please mail to support@anviz.com if you have any questions!
Anviz Technical Support Team
-
Created by: Chalice Li
Modified on: Mon, June 7th 2021 at 17:58

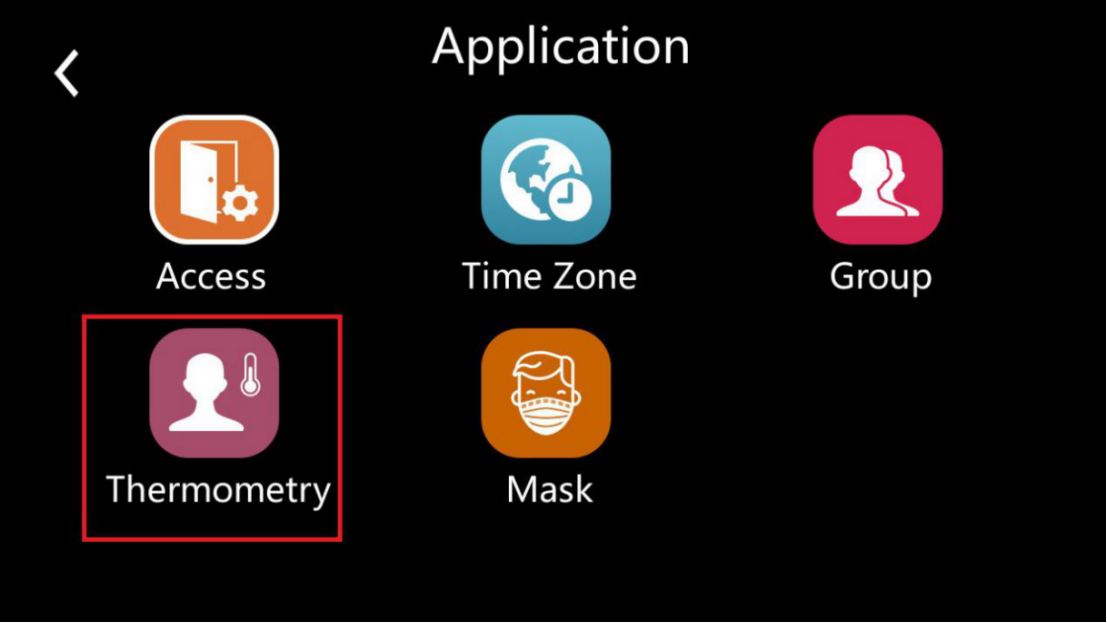
Step1: Go to the application menu through the advanced menu
Step2: Go to the thermometry menu


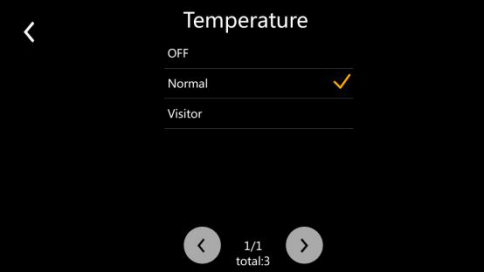
Step3: Set fever alarm in the temperature menu

Step4: Set mask alarm in the mask menu

Please mail to support@anviz.com if you have any questions !
Anviz Technical Support Team
-
Created by: Chalice Li
Modified on: Mon, June 7th 2021 at 16:58

Once your face is enrolled, you don’t need touch the device to be recorded. You can enroll your face by the device Menu or by the web server, CrossChex Standard or CrossChex Cloud.
All records will be automatically saved in the device, the maximum can reach up to 100,000 logs.
Please mail to support@anviz.com if you have any questions!
Anviz Technical Support Team
-
Can I Screen Visitors on FaceDeep 3 IRT? 06/11/2021
Created by: Chalice Li
Modified on: Mon, June 7th 2021 at 17:58

Yes, our FaceDeep3 IRT has the visitor mode, the visitors can be granted access in this mode with the normal temperature and using mask according to the configuration you choose. Below is the guide, how to switch the work mode?
Step1: Go to the application menu through the advanced menu

Step2: Go to the thermometry menu

Step3: Get in the work mode

Step4: The work mode can be switched in this menu

Please mail to support@anviz.com if you have any questions!
Anviz Technical Support Team
-
How Accurate Is The Temperature Sensor? 06/08/2021
Created by: Chalice Li
Modified on: Mon, June 7th 2021 at 16:58

Our FaceDeep3 IRT has the high accuracy sensor, the absolute error is smaller than +/- 0.3ºC (0.54ºF ).
Please mail to support@anviz.com if you have any questions !
Anviz Technical Support Team
-
Created by: Chalice Li
Modified on: Mon, June 7th 2021 at 16:58

Please mail to support@anviz.com if you have any questions!
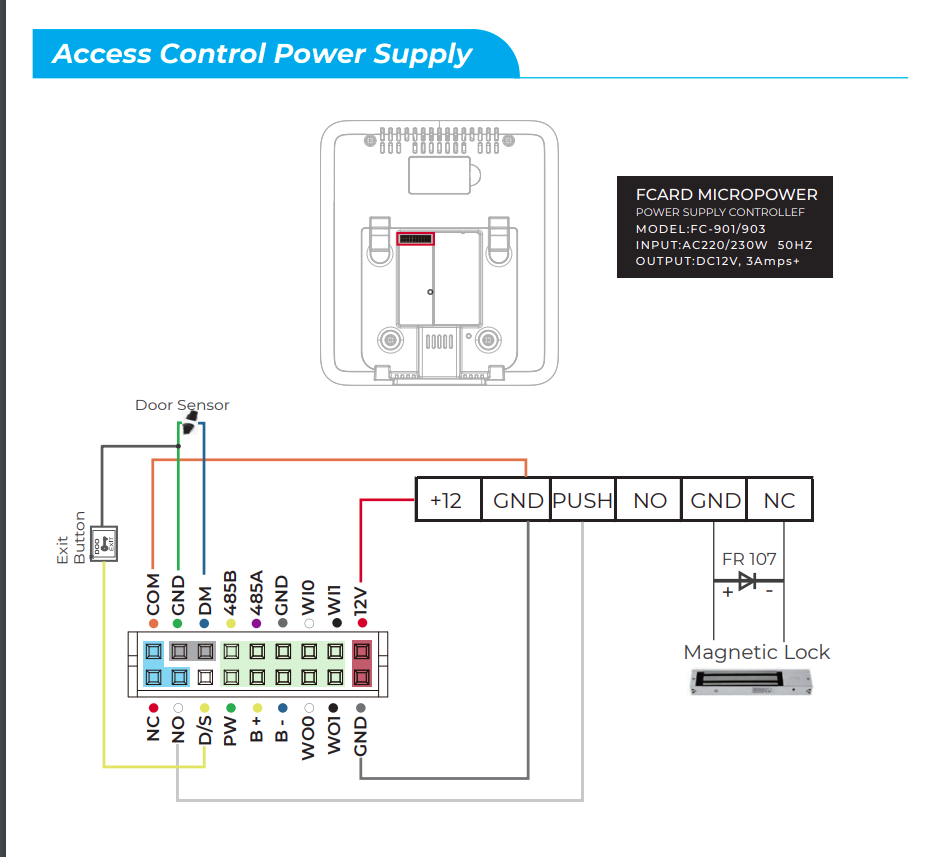
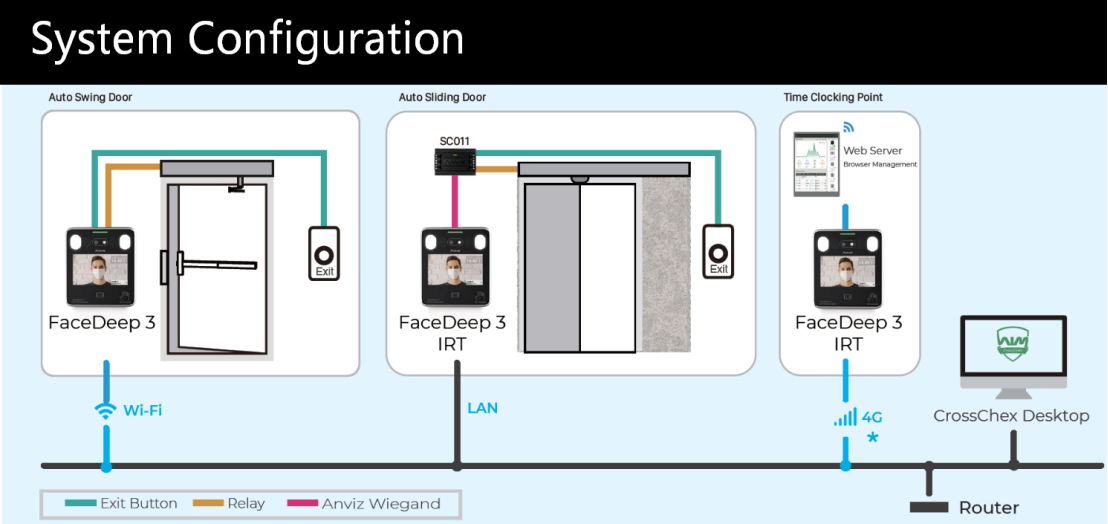
Please refer to our installation guide to see the wiring instructions to connect FaceDeep 3 Series with access control systems. https://www.anviz.com/file/download/6565.html

Anviz Technical Support Team
Related News
Related Download
- Brochure 2.4 MB
- Anviz_C2Pro_Catalogue_EN_08.29.2016 08/16/2019 2.4 MB
- Manual 6.8 MB
- Anviz_C2Pro_QuickGuide_EN_05.09.2016 03/01/2019 6.8 MB
- Manual 1.9 MB
- FaceDeep3_Series_QuickGuide_EN 08/04/2021 1.9 MB
- Brochure 13.2 MB
- 2022_Access Control & Time and Attendance Solutions_En(Single page) 02/18/2022 13.2 MB
- Brochure 13.0 MB
- 2022_Access Control & Time and Attendance Solutions_En(Spread format) 02/18/2022 13.0 MB
- Manual 7.7 MB
- C2pro User Manual 06/28/2022 7.7 MB
- Brochure 1.1 MB
- iCam-B25W_Brochure_EN_V1.0 08/19/2022 1.1 MB
- Brochure 24.8 MB
- Anviz_IntelliSight_Catalogue_2022 08/19/2022 24.8 MB
- Brochure 11.2 MB
- Anviz FaceDeep3 Series Brochure 08/18/2022 11.2 MB



















 on the right corner Cloud logo will disappear;





.png)


.png)

